1. INTRODUCTION
Concrete structures located in maritime environments are deteriorated with time by degradation of the reinforcement bars made of carbon steel; as it has been already reported by Hernández, and Mendoza (2006). In the same way, Tabatabai et al. reported that there are two main reasons for the deterioration of the steel bars of the concrete structures: carbonation caused by reduction in the alkalinity of the concrete and the destabilization of the iron oxide film due to chlorine ions (2009). Then, corrosion of the steel reinforcing bars represents the biggest problem for concrete structures.
Perez-Quiroz et al. have reported that the corrosion products generated during the plain carbon steel corrosion process cause tensile stresses within the concrete, which generates internal cracks and the loss of structural bonding between the reinforcement bar and the concrete (2008).
As example of the importance of corrosion resistance of the material for reinforcement bars in concrete structures, there is a pier in Yucatan, México, which was built between 1937 and 1941; whose concrete structures were made using 304 stainless steel bars as reinforcement. The result is that no rehabilitation has been necessary in the pier´s structures.
In contrast, Klueh and King have reported another pier in the same region of Mexico, whose reinforcements bars were of plain carbon steel, thoroughly damaged by corrosion of the reinforcement bars (1982). In the same way, Istrati, has reported AISI 304 austenitic stainless steel as a good candidate for welding construction for reinforcement bars.

Figure 1 Comparison between the pier with structures made with stainless steel (right) and the pier with structures made with carbon steel (left) (Klueh, R. L., & King, J. F. 1982).
As it has been mentioned above, the study of different materials for substituting carbon steel of the reinforcement bars is a very important issue, since corrosion resistance materials increase the service life of reinforcement bars in concrete structures. However, the proposed materials must be joined to plain carbon steel in order to reduce maintenance cost and increase life service of the concrete structure. In order to reach this, topics such as dissimilar metal welding and the preservation of the mechanical properties of this weldment, must be investigated.
Dissimilar metal welds have been studied since 1935, but such studies are based on failure reports, research, interviews with different producers and users of such joints; with the aim of gather information about the performance of such welds. In this literature, it has been mentioned that the type of bevel of the joint´s preparation must be taken into account in order to get dissimilar metal welds with good properties (Lundin, 1982). In the same way, Doddy in 1992 as well as Ospina et al. in 2007 reported that in dissimilar welded joints between plain carbon steels and stainless steels, carbon diffusion from the plain carbon steel into the stainless steel takes place; moreover, the heat input of the welding promotes the precipitation of the chromium carbides or sigma phase in the grain boundaries of stainless steel.
These phenomena must be avoided to get good corrosion properties in the dissimilar metal welds and there have been efforts in order to propose methodologies to get the best dissimilar metal weld. For instance, Fuentes et al. have reported the properties of dissimilar weld joints between ASTM A537 and AISI 304L austenitic stainless steel using an ER-308L electrode as filler metal without buttering. In this case this weld was carried out using gas metal arc welding (GMAW). In their work, they reported, high hardness values on the fusion line between the weld and stainless steel (2011). However, GMAW is not commonly applied in field welding for concrete structures construction.
In the other hand, Murugan and Parmar have reported that ferritic steel welded to austenitic stainless steel plates using Inconel 625 and 725 as filler metal but they did not use buttering. The results showed no evidence of carbon migration into the stainless steel, but weldments with post welding heat treatment showed evidence of it (1997).
In order to avoid carbide diffusion into the stainless steel in a dissimilar weld, the process of buttering has been proposed as a solution for minimizing mechanical and metallurgical problems in this type of joints. For instance, Winarto et al. have reported that samples with 10 mm in thickness buttering showed higher mechanical properties than samples with 20 mm in thickness buttering. On the other hand, macroetching analysis showed that the Heat Affected Zone (HAZ) was bigger for samples with buttering than those with no buttering (2014). In this case, they used GMAW to weld plates with a “V” bevel preparation, and E7016 as filler metal.
From the above information, it can be said that there is not much information about dissimilar metal welds in bars using Shielded Metal Arc Welding (SMAW) or the effects of buttering using Inconel 182 in stainless steel as filler metal. Therefore, in this work, the influence of Inconel 182 as buttering in the mechanical properties of dissimilar metal welds between plain carbon steel and stainless steel bars welded using SMAW has been investigated. Considering that SMAW is commonly applied in field welding, this methodology can be proposed for the rehabilitation of concrete structures with steel bars as reinforcement.
2. EXPERIMENTAL PROCEDURE
First, it must be mentioned that for this work all materials, electrodes, and welding process were selected by the criteria of price and use in the welding field. So then, the SMAW process was selected in this work because it is commonly applied in field welding of the reinforcement bars for concrete structures; as well as the single bevel joint, has been selected because this type of joint is the most common joint preparation for reinforcement bars. The base materials were bars of ASTM A615 carbon steel and AISI 304 austenitic stainless steel.
The filler metal was AISI 309L stainless steel and buttering, was carried out using Inconel 182 in a 2 mm thickness layer welded to stainless steel. AISI 309L stainless steel was selected as filler metal because it is commonly applied in stainless steel welds, since it has a chemical composition of the base materials similar to AISI 304. Moreover, AISI 309L and Inconel 182 can be found in electrodes for SMAW with a diameter of 3.2 mm for each material. In fact, these electrodes are sometimes used as buttering using GMAW o GTAW process in weld joints between stainless steel and plain carbon steels. Besides, Inconel 182 was selected for the buttering because its high nickel content and relative low price. Buttering was carried out in 5 stainless steel bars with an Inconel 182 electrode, in order to determine the effect of this material with the stainless steel, and at the same time in order to observe the effect of AISI 309L welded to plain carbon steel. The welding process was carried out by SMAW process with an electrode 309L as filler metal. The chemical composition of Inconel used is reported in Table 1.
The preparation of the specimens was carried out according to the following procedure: 10 bars of AISI 304 stainless steel and 10 bars of A615 plain carbon steel with 19 mm in diameter and 100 mm in length were cut as base metal for the welding joints. The stainless steel bars were machined at 45° as preparation of the single bevel joint.
10 joints were prepared according to NMX-H-121-1988 and ANSI/AWS D1.4-M-2005. Buttering was applied on 5 stainless steel specimens with the 45° bevel groove. This process was carried out so in order to avoid carbide and sigma phase precipitation in the buttering region. One must to keep in mind that this Inconel 182 contains chromium, which can combine with the carbon that diffuses from the plain carbon steel. The welding machine was a Castolin Eutectic, Master NT2000 AC/DC; the welding parameters applied are shown in Table 2.

Figure 2 Schematic diagram of the single bevel dissimilar welded joints. The left bar was the ASTM A615 Steel and the right bar is AISI 304 stainless steel.
In order to determine the variations in hardness among the base metal, filler metal and heat affected zone, microhardness profile was measured in the longitudinal direction of each specimen. The measurements were averaged and then they were verified to meet ASTM E384. The microhardness testing was carried out using a High Quality microdurometer model MMT-1. The load used was 300 kgf; the indentation was observed and measured at 400X.
The tensile test was performed according to ASTM E8-M in an Instron FAST TRACK universal testing machine, model 8801. The samples were tested at 3 MPa/s and the deformation was measured using an extensometer.
Finally, these dissimilar welded joints were microstructural characterized by optical microscopy; the samples were prepared according to ASTM E3 and microstructure was revealed using Berahas etchant for the stainless steel and NITAL 2 for the plain carbon steel. The microstructural analysis was carried out using a NIKON 440 metallurgical microscope. The macrostructure of the specimens was revealed according to ASTM 340 and analyzed using a LEICA stereographic microscope.
3. RESULTS AND DISCUSSION
The chemical composition of ASTM A615 steel was determined by optical spectrometry and the results were applied to compute the carbon equivalent (Ceq) for the ASTM A615 steel bars. The calculated Ceq is 0.3683, which indicates good weldability of the plain carbon steel because it is lower than the 0.55. This value is stipulated in ASTM A706/A706M.
Besides, it was necessary to calculate the chromium equivalent (Creq) of the stainless steels, in order to determine the susceptibility of the stainless steel to sigma phase precipitation. In this case the Creq. is higher than 17; then this stainless steel is prone to sigma phase precipitation in the heat affected zone. This fact indicated that this steel should not be heat treated and the heat input of the welding process must be as low as possible. Table 3 shows the calculated Creq.
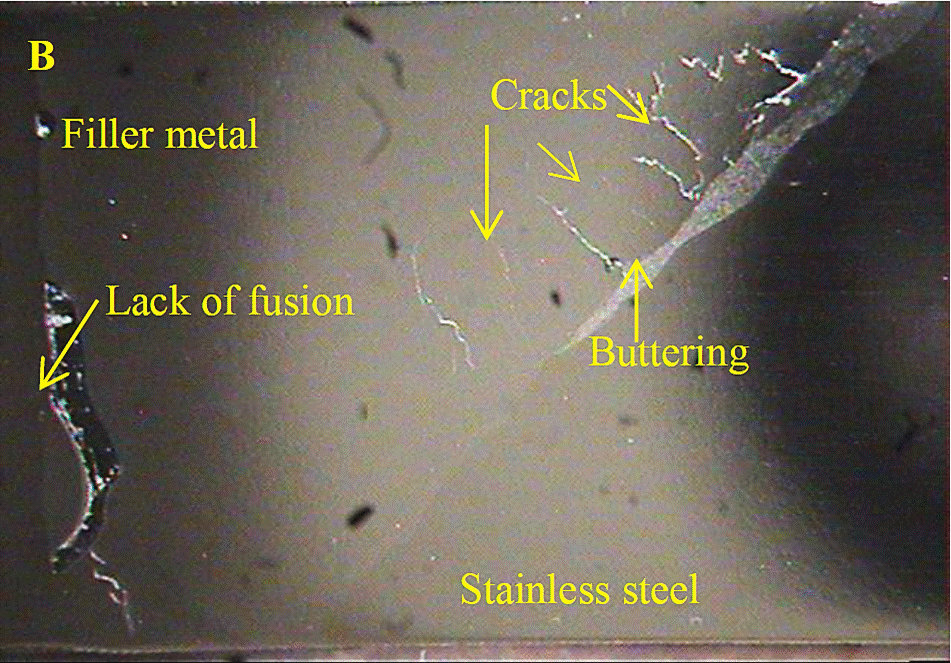
The macrostructures of the welded specimens were observed through stereographic microscope. The results of the specimens with buttering showed evidence of cracks in the filler metal but the cracks had its origin in the buttering layer of the specimens. An example of the cracked specimens is seen in Figure 3B; while Figure 3A shows the macrostructure of the specimens welded without buttering and no evidence of cracking is observed. This fact points out that dilution between the Inconel 182 of the AISI 309L of the filler metal induced cracking. This matches the results of Evans, who reported that nickel alloys joined to stainless steel are prone to hot cracking (1962).
In the same way, the chemical composition of the Inconel 182 and the AISI 309L indicated high nickel in both alloys; so then it is feasible that the nickel equivalent of the joint increases with the dilution of both Inconel 182 and stainless steel. In literature, it has been reported previously by authors as: Jang, Ospina, Fuentes, that a percentage of ferrite between 7 and 12 is recommendable for avoiding hot cracking in austenitic stainless steel (Jang, C., Lee, J. H., Jung, S. Y., Kim, J. S., & Jin, T. E. 2006; Ospina, R., Aguirre, H., & Parra, H. 2007; Fuentes, A. L. G., Centeno, L., García, R. D. S., & Del Rosario, A. V. 2011).
Macrographs showed evidence of lack of fusion located near the plain carbon steel in the single bevel joints (Figure 3A). This is a serious defect because in weldments it functions as stress riser during service and this leads to failure of the welded component. However, this defect is commonly originated by the lack of skill of the welder; so even if the welder is very skilled this defect can be induced in some welds. Another cause of lack of fusion is a low welding current. In this case the welding current is in the recommended range for these materials (between 75A and 110A); so this cause can be discarded. In each case, it is important to mention that even though some samples had lack of fusions, they showed good tensile strength and this is very important for the structure performance. This fact is discussed in detail later on.
3.1 Microstructures of welded joints
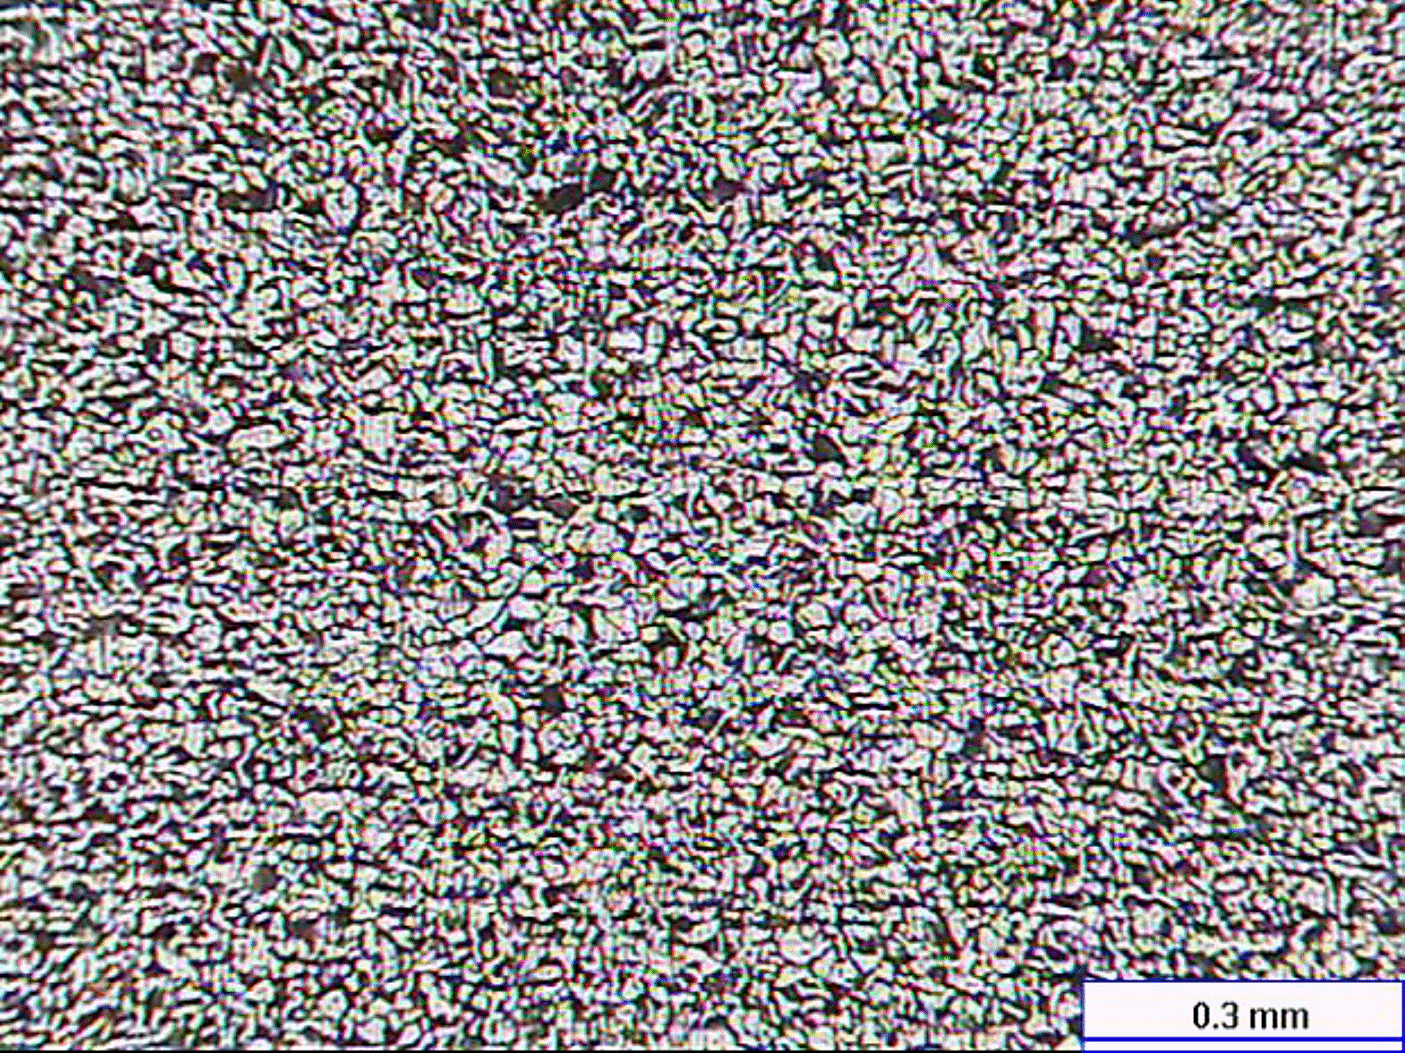
Figure 4 shows the microstructure of the plain carbon steel as base metal; there can be seen equiaxial bands of ferrite grains and bands of pearlite. In the case of Figure 5, it shows the microstructure of austenitic stainless steel as base metal. There can be seen twinned grains but there is no evidence of sigma phase or metallic carbides precipitated in the microstructure.
In Figure 6, the Heat affected Zone (HAZ) of the interface between the plain carbon steel and filler metal is shown. In the plain carbon steel there is no abnormal grain growth of the ferrite grains or cracking is observed in any specimen.
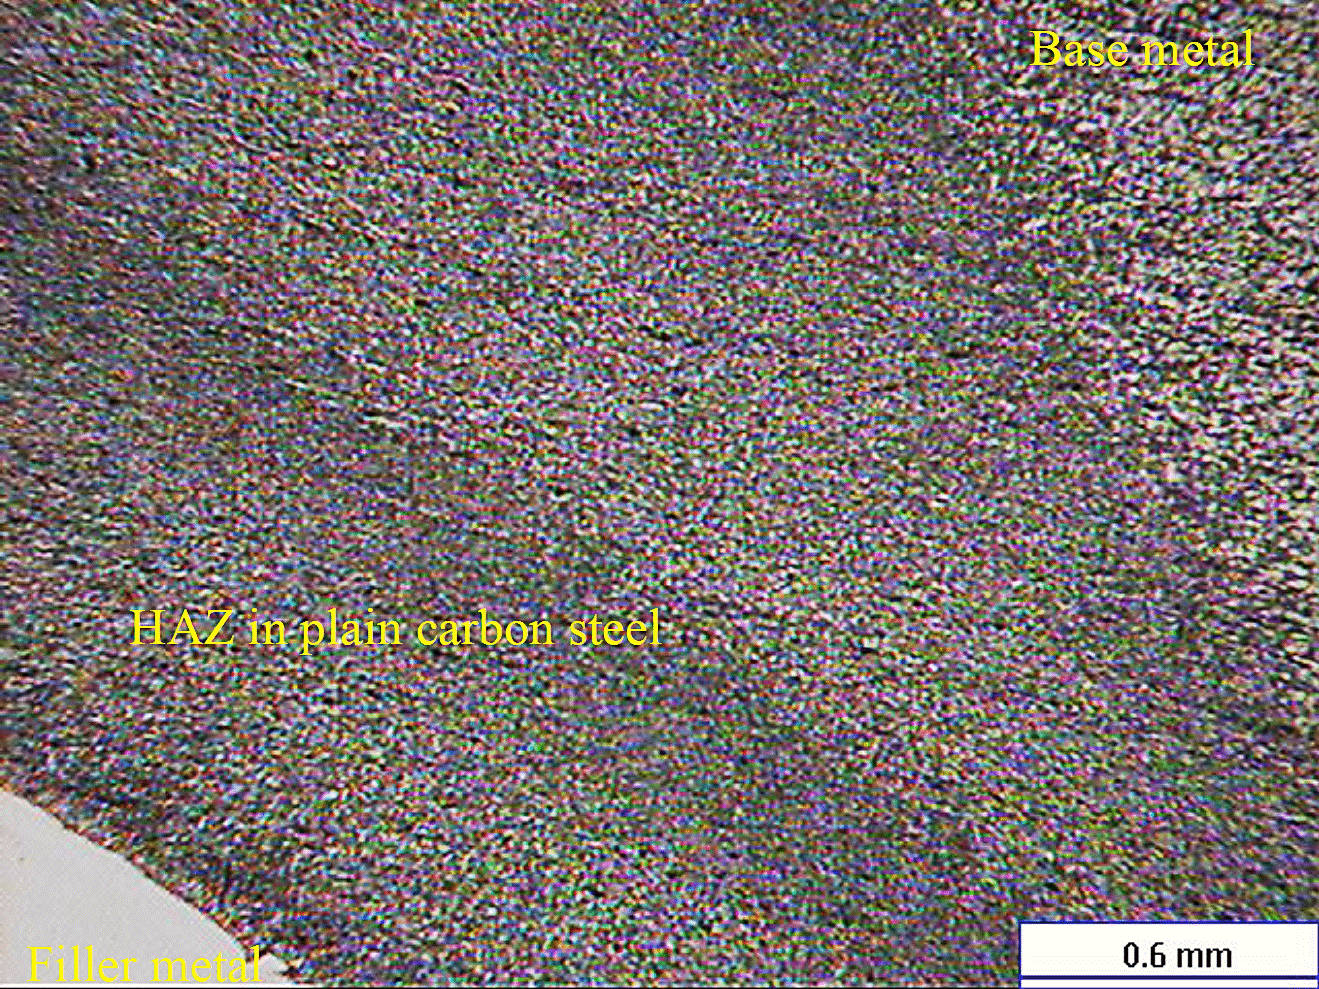
Figure 6 Microstructure at 50X of the weld between the plain carbon steel and the filler metal. No evidence of either, cracks or abnormal grain growth, is seen.
Moreover, no evidence of carbon diffusion from the carbon steel into the AISI 309L was found. This fact is very important because it agrees with the results of Murugan and Parmar and it indicates a no sensitization on the filler metal. Therefore it is feasible to weld low carbon steel to stainless steel using AISI 309L as filler metal without buttering and at the same time with no evidence of sensitization of the stainless steel.
Figure 7 shows the microstructure of the interphase between plain carbon and AISI 309L steels; there can be seen no evidence of sensitization in the grains boundaries of AISI 309L. In spite of applying SMAW welding, no cracking of carbide precipitation was found in the AISI 309. This is important if one considers that SMAW normally induces heat inputs higher than heat input of GTAW or GMAW.
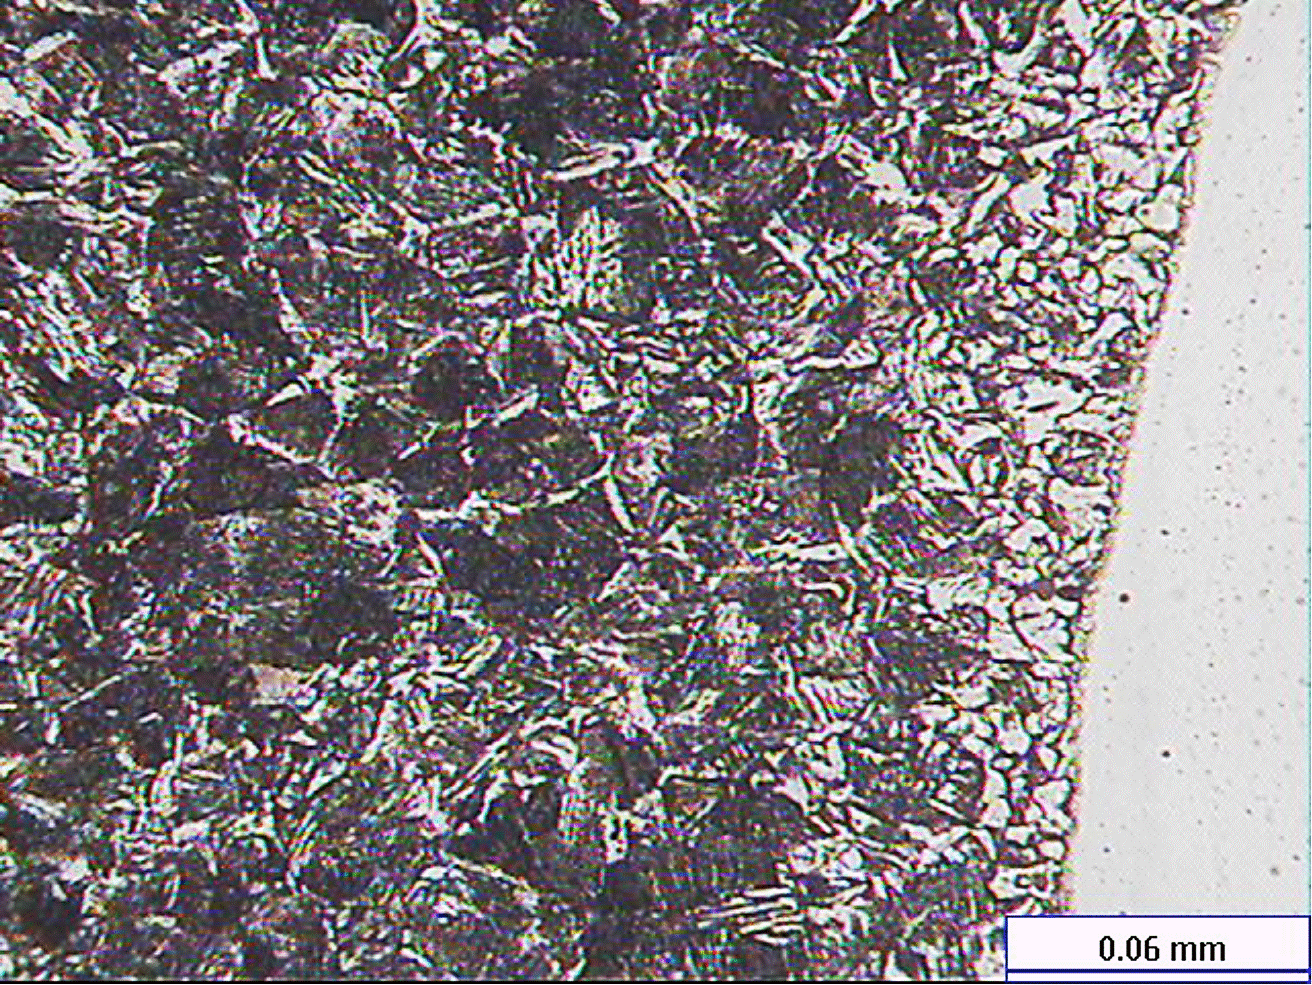
Figure 7 Microstructure at 500X of the weld between the plain carbon steel and the filler metal. There can be seen no evidence of precipitated carbides in the grain boundaries of AISI 309.
In the other hand, the microstructure of the plain carbon steel consists of martensite; which is a typical HAZ microstructure of carbon steel weldments joint using SMAW. One has to notice that no evidence of cracking was found in any sample in the interphase between plain carbon and AISI 309L steel. Then it is possible to weld by SMAW plain carbon steels to austenitic stainless steels without filler metal using AISI 309L as filler metal.
Figure 8 shows the microstructure of the interphase among the filler metal, the buttering, and the AISI 304 stainless steel. There can be observed cracks between the buttering and the filler metal. In the same micrograph can be seen that the crack´s origin is located in the interphase between the buttering and the filler metal, this fact support the above discussed possible origin of the cracks. Besides, in the micrograph of Figure 8 is also seen evidence of shrinkages among the dendrites in the interphase between the buttering and the filler metal. Furthermore, it is clear that shrinkage continues growing into the dilution zone between the material of buttering and the filler metal. This fact agrees with the results of Evans.
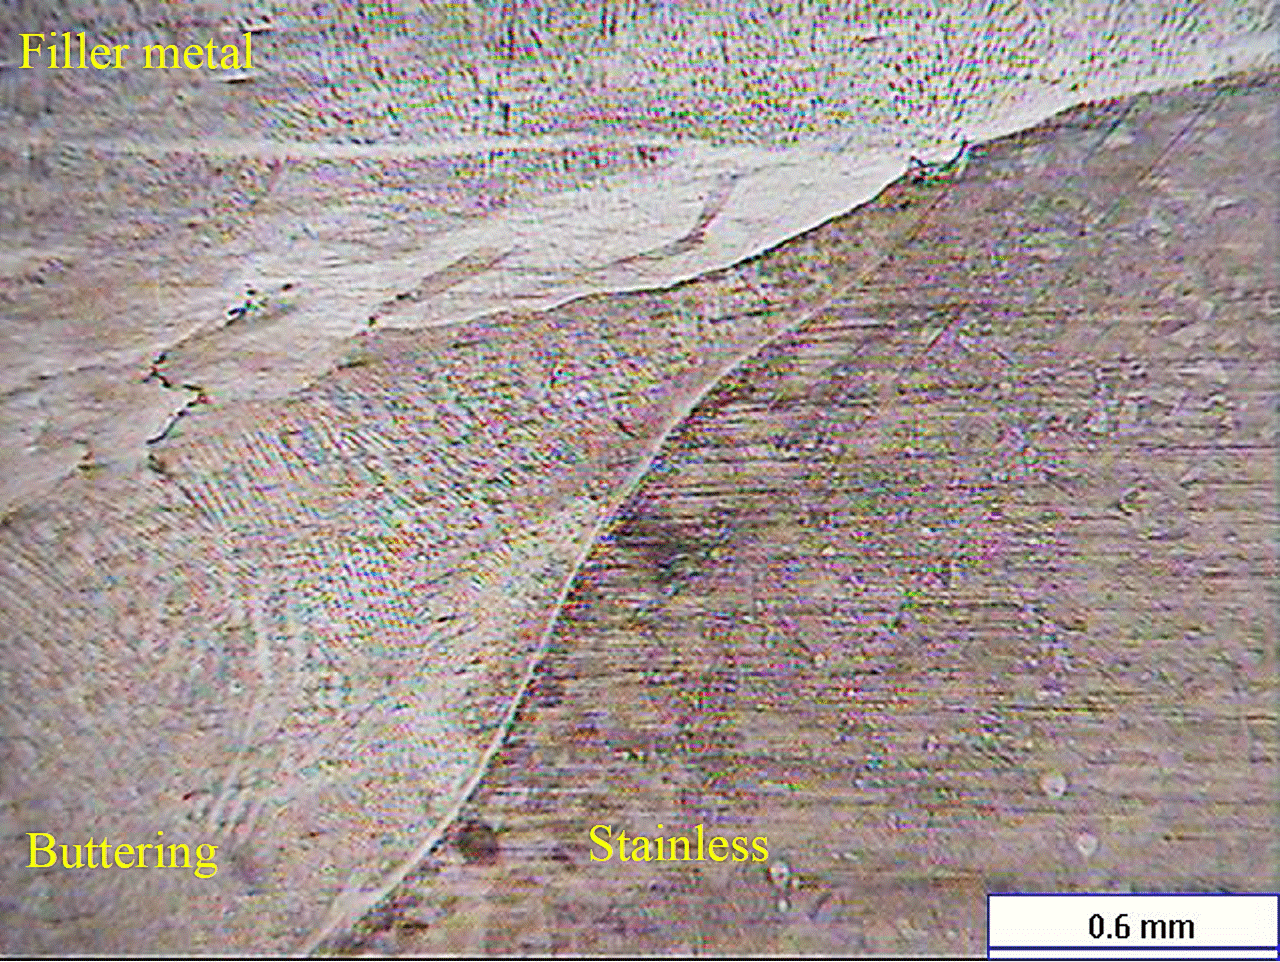
Figure 8 Microstructure of the welded joint between the buttering and the stainless steel. There can be seen cracks in the dilution region filler metal/buttering.
The above discussed microstructural evidences indicated that austenitic stainless steels welded with buttering using Inconel 182 are prone to cracking. This fact indicated that reinforcement bars for concrete structures must not be welded with buttering as long as the filler metal is properly chosen, this topic has been previously discussed in the literature (Jang, C., Lee, J., Kim, J. S., & Jin, T. E. 2008, Olden, V., Kvaale, P. E., Simensen, P. A., Aaldstedt, S., & Solberg, J. K. 2003, Shinozaki, K., Ke, L., & North, T. H. 1992. Murugan, N., & Parmar, R. S. 1997). These evidences indicate that the nickel percentage plays a very important role in the selection of the filler metal and in the buttering material.
3.2 Vickers microhardness results
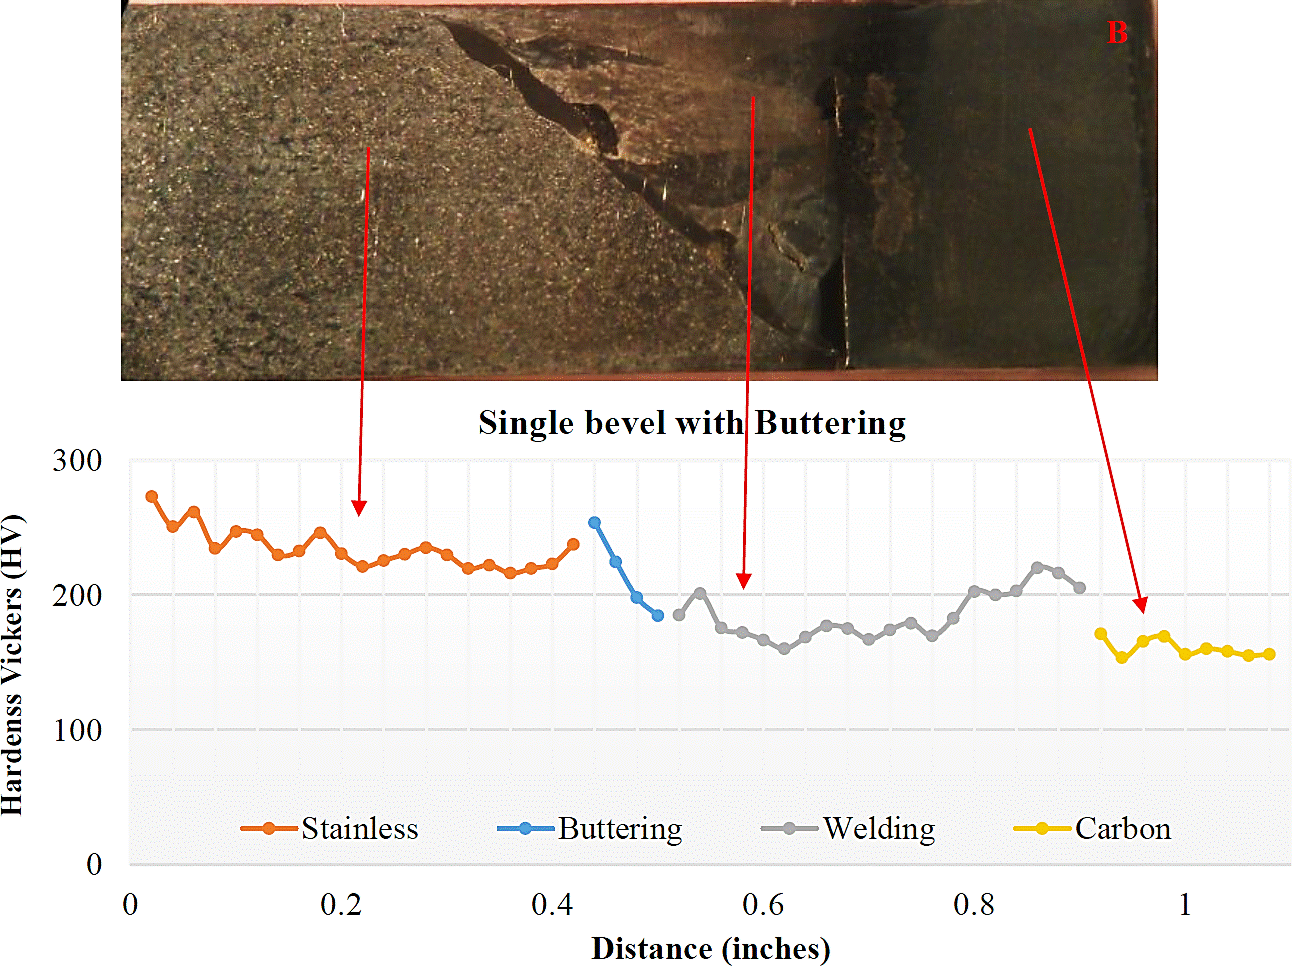
Figures 9A and 9B show the microhardness profile obtained in the single bevel joint. There are seen differences between the specimen with buttering and the specimen without buttering. For instance, the average hardness of the filler metal is higher in the specimen without buttering than in the specimen with buttering. In the case of the plain carbon steels, the average microhardness in the specimen without buttering is higher than in the specimen with buttering. This fact is related to the martensite in the interphase between the plain carbon steel and the AISI 309L. In the same way, it can be mentioned that the lower average microhardness in the filler metal in the specimen with buttering is an evidence of the lack of carbon diffusion into the filler occurred. But in the case of stainless steel, the average microhardness is higher than in the same area of the specimen without buttering. This fact can be explained by dilution of nickel in the stainless steel, which causes solid solution hardening (Cunat, 2004).
3.3. Tensile testing
In the engineering stress-strain curves of the single bevel specimens was observed that the specimens without buttering showed higher ultimate tensile strength (UTS) than the specimens with buttering (Figure 10). This fact agrees with the results of the microhardness measurements, where it was seen that the specimens showed highest values of microhardness in the interphase of the filler metal and the carbon steel.
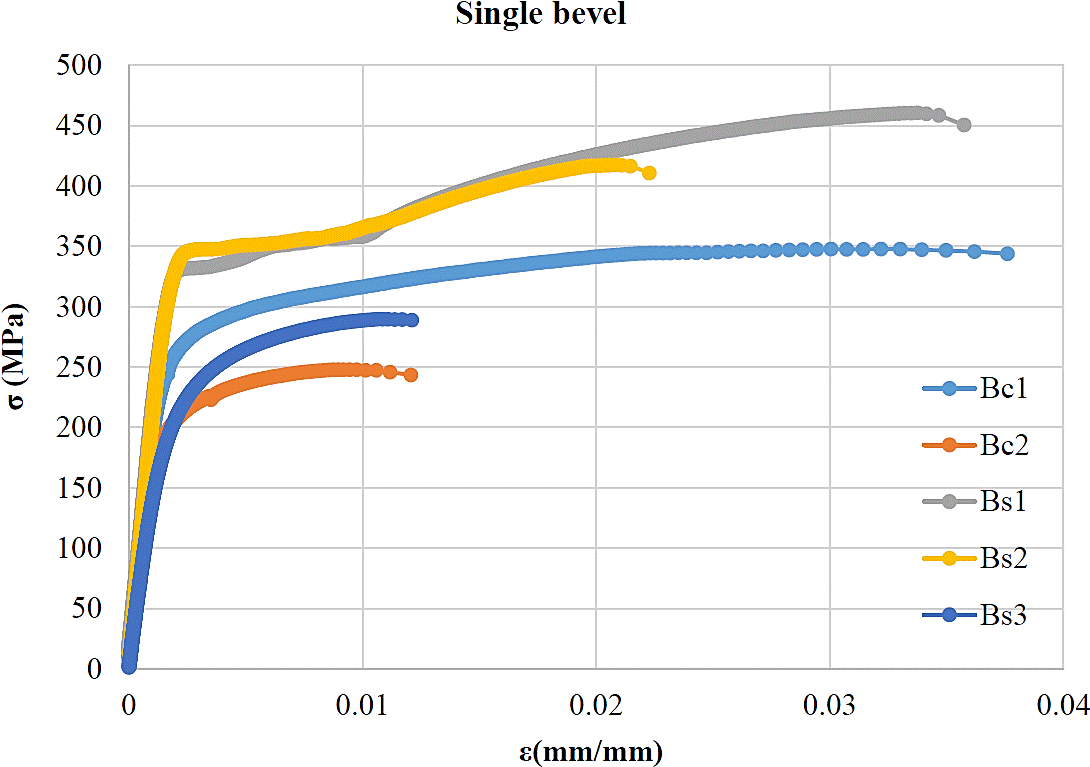
Figure 10 Stress-strain curve of single bevel specimens.Bc1, Bc2, were the samples welded with buttering; Bs1, Bs2, Bs3 were samples welded without buttering.
The yield strengths of the specimens with buttering are 50 MPa higher than the yield strength of the specimens without buttering, but the elongation of specimens with buttering is larger than in the case of the specimens without buttering. These facts can be explained by the macrostructures, which indicated that the specimens with buttering are more likely to contain defects such as lacks of fusion or cracks that acted as stress risers and they influenced the mechanical behavior during the tensile test. Nevertheless, it is important to mention that in spite of presence of defects such as lack of fusion of porosity, the specimens showed UTS higher than 200Mpa. The main influence of defects is in the elongation of the samples.
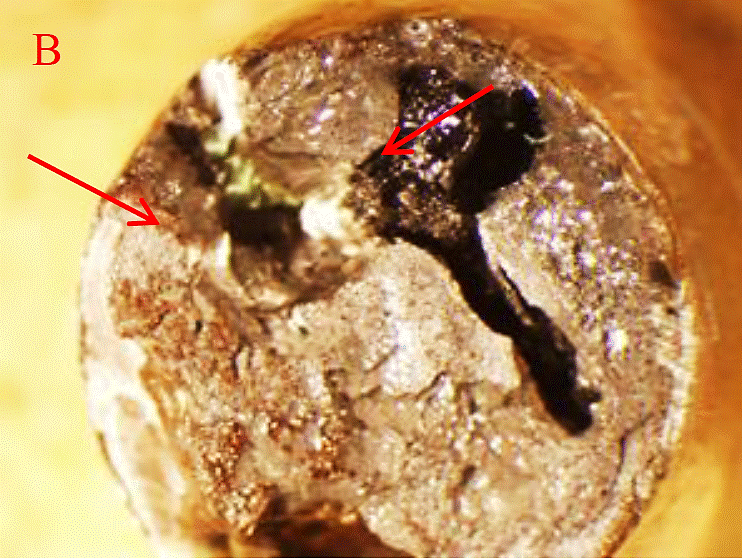
Regarding the fracture of the specimens, with exception of specimens that showed welding defects such as lack of fusion or blowholes, the fracture were located at the plain carbon steel side of the samples. Figure 11A and Figure 11B show the fracture surface of the specimens that failed under lower fracture stress than the stress of the other specimens with the same preparation. The influence of these defects in the mechanical behavior of these specimens is proved by the fact that welding defects are revealed on the fracture surface of the specimens. For instance, Figure 11A the fracture surface of the single bevel specimen with buttering. A lack of fusion on the fracture is the origin of the fracture. This is proved by the river marks indicated with black arrows. These results agree with the work of Jang et al. They showed that the fracture of dissimilar welded joints using Inconel as filler metal strongly depend on the weld (Jang, C., Lee, J., Kim, J. S., & Jin, T. E. 2008).
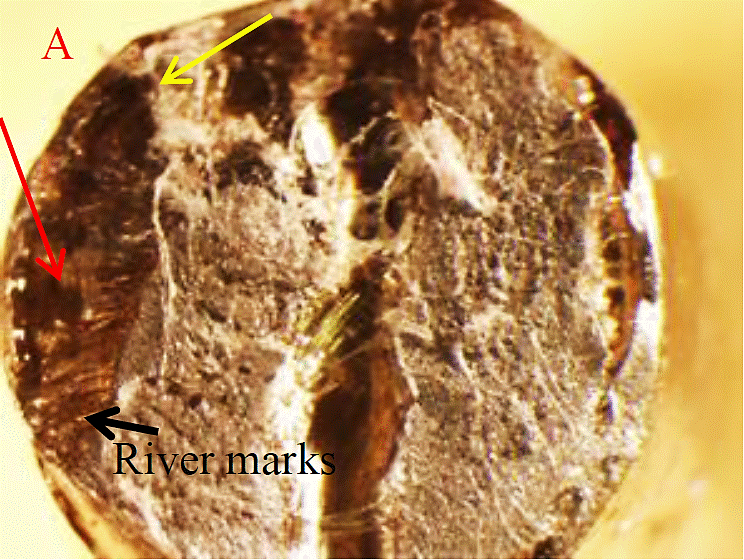
Figure 11A Fracture of the specimen with single bevel specimen with buttering. Lack of fusion (red arrow) and blowholes (yellow arrow) are observed on the fracture.
4. CONCLUSIONS
The evidences discussed above lead to the following conclusions:
Specimens with buttering are prone to show cracking in the interphases between the buttering and the filler metal.
The welds between AISI 309L and plain carbon steel showed no evidence of cracking.
Specimens without buttering showed higher average microhardness in the filler metal.
Specimens without buttering showed better mechanical properties.
The chemical composition of the materials for the buttering and the filler metal are very important for the integrity of the weldment.


 texto en


